Sunday, March 27, 2011

App from App Store on multiple Macs

I Love My AppleToday I tried to purchase iLife 11 on my iMac 27. Actually I purchased this item about one month ago when I was on my iMac 24. On the web, some people say that you can install an app from App Store on more than one machines. I was not sure it is true. I tried to get it on my iMac 27 about 1 week time later after my initial purchase. I got a warning message saying to Buy app. I stopped there to avoid double charge.


I talked to Apple tech person when I was picking up my repaired iMac 24. I told him that I had purchased iLife11 from App Store and asked him if I could get it back. He told me that, if I cannot find it from my TM, I should be able to repurchase it from Apple Store without any charge.

"You can install the app up to 5 machines. If you get charge, just phone iTunes support line", he said with confidence. This is confirmation, at least from Apple people.

Today I went to App Store again on my iMac 27. After I pressed "Buy" button, I saw this message:


I am really happy with the App Store. It is a great news for Mac users.

My iMac24 is Back

Last Friday, the same date iPad 2 is available in Canada, I got a call from the local Apple store about my iMac 24 is ready for pick up. I went to the store after work. There were a lots people outside and in the store for iPad 2. I was warned that there would be long time to wait; however it did not take to much time to get my iMac 24 back. I paid $264.00 for the replacement of the HD, $39 for the service and tax, in total of $318.15.

With my TM as backup, I did migration of all my OS and data back when I got home (it was late since I spent about 2 hours in line to get a new iPad 2). The migration took quite long time, about 3 hours. After that, I had to run Apple updates to get all the newest update during the time my iMac at Apple store. After that everything are back.

This was the first blue screen when the power was on:


Apple installed OS on my iMac. So quickly I was the OS screen with searching for my wireless keyboard.


Mac OS found my TM and prompt me to the installation and migration screen. I selected "From a Time Machine backup"


It took a while for the migration to figure out the space needed for restoring:


At the start, the estimate time was over 1 hour, but soon it was changed to 4 hour and then 3, 2, 1. I cannot remember actual time it spent. I was on another iMac 27 and about 1:00am on the next day I finished the migration.


The Apple Software Update after the migration took another very long time period. I did not wait for the complete. The next day I checked my iMac 24, and I found that all my OS, application and data are back to their status, including my purchase of iLife 11 from iMovie 11. Now my iMac 24 is back to work.

Tuesday, March 22, 2011

My iMac24 is Dead!

Last night my iMac 24, my first Mac purchased in 2007, was dead. It was in white screen and I could not login. I tried to turn off the power and turned it on again several times, still no luck.


Then I tried to book it from my Mac OS CD. At first, there was no internal HD in destination for installation, only my USB and TM drives are there:


I opened Disk Utility from menu, there is no HD neither:


I tried to erase the HD to see if I could get it back with clean disk. I got error message. I tried to do partition as well and also an error. All those process took long time to the point of error:


After all those tries, fortunately, I saw my Mac HD. I then verified and repaired the disk. It took about half hour and finally there was an error message:


All those tries were failed. One little progress was that I got my login screen again. I could login to my account. It looked like OK, but I am sure the HD has issues.

I sent my iMac 24 to local Apple Store(Market Mall). I was told that the HD was dead for sure. There was another issue about CD sensor, which costs about $13.00, but the HD and repair costs me about $313.00. To buy an internal HD with 500GB in the market will cost less than $100.00, but I would not take the risk the hassle to do it myself. I was told that the repair will take about 1-3 business days to get it back. I hope it will be fine.

Mac OS 10.6.7 Update

This is Mac OS 10.6.7 update. Based on rumours, this update is mainly for MBP product line. At the same time, I saw Apple also has a update 4.2.1.


Command: df -lakUsed(Kilobytes in 1024-blocks)
Before ...571,544
After...5,152
Difference (A-B)-566,392

Sunday, March 20, 2011

New Icon: I Love Apple

I Love My AppleI have created a new icon for my blog: I Love My Apple. This icon is based on Mac symbol fonts. Here are the steps how I did this creation.

Find Symbols from Font Book

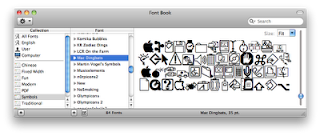
Font Book is a utility application that comes with Mac OS for viewing and managing fonts. In Mac OS, fonts can be organized by collections. Within Font Book, all symbol fonts are within Symbols collection (if you download new fonts, those fonts may not be in Symbols collection, but you can easily move them there).


Font Book provides only samples for view. It does not have the complete view of all characters.

Enter Symbols in a Document
I used NeoOffice to edit my doc. If I can find any symbols from the Font Book, I'll copy and paste them to my doc. Since FB does not display all the characters by fonts, I have to find symbols if they are not visible in FB.

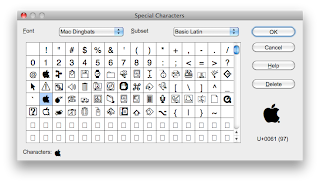
In most document editors, there is way to insert character from menu Insert|Special Character... to get a window for selecting special character.

Notice that a unicode is displayed when a char is selected. This is very helpful if you know the unicode from a font. There are many free Mac fonts available and they may have complete symbols with unicodes.

For my icon purpose, I used several symbol fonts. Here is a list of fonts:
  • I: TackODing
  • Love: VTMeiOrnamentsOnBlack
  • Apple: Mac Dingbats

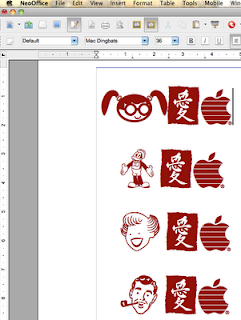
Here is the doc with several examples. The first girl is from font Chickabiddies, the second carton from TackODing, and third lady from TackODing.


Take Screen Shortcut

Finally, I take a screen shortcut to capture interest area as a png picture. It is very easy to do in Mac: use the screen shortcut key command+shift+4 to select an area. The result will be a png picture on my Desktop.

I always use Yahoo's SmushIt web service to further reduce the size of the picture. This compress will save about 10-30% in size without any quality difference in visual mode.

By the way, there are many additional fonts are available on web. Here is a web for Mac fonts.

Monday, March 14, 2011

Apple Web Link to Donate for Japan Earthquake and Tsunami Relief

I found yesterday that Apple web page in US has a link for donations for Japan earthquake and tsunami relief. However, it did show anything in my iTunes after click. Today it works. I placed my little donation through Apple to Japanese people.


Wednesday, March 9, 2011

AppleTV Updated: iOS4.3?

Today my AppleTV also has an update. It looks like that this one is related to iOS4.3. Not sure what new features are in this update. Here are some photos I took by using my iPhone 4. Sorry for unclear pictures caused by my shaking hands.

I found the new updates when I turned on my AppleTV:


Whats new after the update:


One obvious new item in the main screen: MLB.TV


iOS 4.3 Related Updates

Before iPad 2 release on Mar 11, 2010, I got a massive updates related to iOS 4.3. First was iPhone 4 update, then iPad update. After that, the software updates contain iTunes 10.2.1, Sarari 5.0.4 and Java Mac OS Update 4.0.


The following is the comparison of the used space differences between each before and after(command: df -lak, unit: Kilobytes in 1024-blocks):

ItemsUsedDifference(A-B)
Before ...7,492,136
iPhone4
After
...7,946,484454,348
iPad1
After
8,633,524687,040
Others
After
8,709,44875,924

Saturday, March 5, 2011

Quick and Dirty Tips: 2 Terminal Commands

Terminal is a very useful application in Mac OS. It is a Mac application located at /Applications/Utilities folder. There are tones of command available you can use in Terminal. Actually many GUIs in Mac OK are based on those commands or scripts. The UI is used just for getting information to execute Terminal commands.

Here are two very interesting, I think useful as well, commands. The first one is reboot. Obviously it is a command to reboot your Mac. To execute it you have to use sudo command to do it:

YourMac:~$ sudo reboot
Password:

sudo is a command for supper user. The command reboot requires supper user to execute.

The second command is more flexible. It is shutdown. There are additional arguments you can specify to execute the command. For example, when you want to shutdown, reboot if you want to, force to shutdown if there are some other users on and messages you want to use as a warning notice. As same as the first one, you need to use sudo to execute the command:

YourMac:~$ sudo shutdown -r -k +2 Please get out of this machine!
Password:

The above commands will reboot the machine and force all the users log out in 2 minutes.

Another interesting thing I found is that normally, only the user with administrator privilege can execute above commands. If you are standard user, you cannot reboot your machine by those commands even you know the sudo password. This is Mac OS security issue. You may set standard user with root right, but I could not figure out. I think it is better to keep standard user in its default settings. Personally speaking, I think to use standard user is more secure. You just don't need the administrator rights in most cases if you just use apps such as Safari, iMovie, iPhoto or iWorks.

Thursday, March 3, 2011

iTunes 10.2 Update


This iTunes 10.2 update is related to the new coming iOS 4.3 sharing to mobile devices, according to AppleInsider.

The following is the comparison of the used space difference between before and after:

Command: df -lakUsed(Kilobytes in 1024-blocks)
Before ...35,236
After...70,000
Difference (A-B)34,764