Sunday, September 10, 2017

Do you know your sleep patten?

If you ask me this question several weeks ago, I would shrug and could not tell you anything. Normally I would go to bed when I feel really exhausted. I have no problems to sleep and would go all the way to the next morning or the time I have to go to washroom. However, my sleep may be interrupted by some sudden events or some thoughts causing me awake hardly back to sleep. If this kind of things happen more, it may indicate my health status in downhill.

I know that sleep is very important in terms of health. With mobile technology in past years, I notice that many mobile device or sensors could tracing sleep pattern. However, I have been very hesitate to purchase one just for monitoring my sleep pattern.

Until recently, an icon in Clock app caught my attention. There is a new icon in the tool bar in the Clock app. The icon is a bed. Soon I found out this is called as BedTime, something related to sleep. After my initial investigating, I really love this simple and elegant app.

How to open BedTime

Normally I open Clock from Control Centre, swapping from bottom up. Clock is one of most commonly used apps, finding world time and setting up alarm.


The BedTime is right in the middle of bottom tool bar.


The first time open this app, you will go through several steps to set it up. I think you don't need to bother about details of each setting, just accept the default settings. You will be able to change those settings when you know how to use it. Here is the main screen of BedTime.


The Options on the top left corner is the place you can change settings.

Use BedTime

The interface of BedTime is very simple. The yellow circle arc indicates sleep time, one end as to bed time and another as up time or alarm time. You can tap on either end and drag to a time as your wish. The number in the middle shows the duration of bed time.

If you want to keep certain number bed time time, for example 8 hours, you can set up both ends first, and then drag the yellow circle to adjust both to bed time and up time with bed time unchanged.

After your setup, you may get a notification before bed time, 15 minutes as default. At up time, alarm will wake you up. I find out this is really good replacement of alarm.


You can tap on Stop or open your iPhone with a tap on Home or on Stop button.

Note: there is a separate volume control for alarm in BedTime's Options.

Tips and Tricks

You can enable/disable Bedtime time on certain days within a week. There is only one setting for bed time and up time. You cannot set different times for difference days within a week. Fortunately, I know well about when I should be up the next day. So I set up my bed time and up time every day to guaranty my sleep time. I think it is good to set up bed time every day so I keep more attention to my sleep.

As iOS ecosystem, BedTime is integrated with Health app. All the history bedtimes are saved to Health Sleep section.


From Health, you will see more detail about your sleep data, as well as deleting and adding data.

One interesting thing about BedTime is that this app is smart enough to know when you are awake. If you touch your iPhone during bedtime to open it, that active moment is marked as one end of bedtime, and the next inactive moment would be marked as another in-bed time. This is really good if you have to get up do something, for example washroom. You will be able to see your sleep pattern in more detail in Health Sleep section.


If you manually add sleep time from Health, you will set three types of sleep data.


Notice that the time from BedTime saved to Health Sleep section is "In bed". There are other two times: Asleep and Awake. Indeed, there is no connection to any sensors in BedTime can tell if you are in asleep. This app is a simple one to let user to set up bed time and up time. Therefore, it will be up to user to make accurate adjustment in order to trace user's sleep pattern.

After weeks use, I really like this new feature in Clock. At least there is a way to let me know my sleep pattern, at least very close to (actually it records in bed time). BedTime also let me know if I have enough sleep time so that it would motive me to pursue a heathy life style.

Thursday, April 13, 2017

Get Media from iOS Devices to Mac

There are many ways to get photos or movies from iOS device to Mac. For example, using Photos, iMovie or iTunes apps. However, those methods would place media into app's libraries. Sometimes, I may use another Mac or friends Macs where I don't want to save my media.

Here I recommend two methods to do that.

Image Capture


Image Capture is an app come with Mac. You can easily find it from Spotlight.


In order to get media files from iOS device, you need to connect your device to the Mac. Then you will be able to see media files on your devices in Image Capture. The neat thing about this app is that you can also import media files from any other devices, such as camera, Android device, or USB hd.

AirDrop


This method is so convenient that you don't need to a wire to connect your iOS devices to Mac. In order for your Mac to accept files from your iOS devices, you have to set up your iOS Airdrop to Everyone. This can be done easily from iOS mission control panel.

Open your Finder and select AirDrop on left panel. This will make your Mac ready, as an AirDrop point, for iOS to share.

Then you can open your Photo app on iOS. Select photos and movies.  Tap on share button. Finally, select your Mac icon to send files. All shared files will be saved into your Download folder on Mac.

The only restriction is that this method is available to iOS devices.

By the way, AirDrop is also the best way to share media between iOS devices. You will be able to get original media with timestamp, location and other meta data.

Using Automation for Different Text-to-Speechs

I like Mac's Text-to-speech feature very much. Within System Preferences, you can set up a default voice for this feature in Dictation & Speech. Then you can select a text anywhere, for example in Safary, and you can let Mac to read text for you. Since Mountain Lion, Mac OS X provides support for Chinese. I like this feature very much.

However, it is so inconvenient to make changes if I switch between English and Chinese. I want to find out a simple way to change default voice, for example, from Alex to Ting-Ting.

Finally I found a solution. It is actually very easy. Here are steps.

Create A Service by Automator


First, launch Automator from Spotlight. Select service.

In the right panel, add two items to workflow: Service receives selected text, and Speak Text.


Repeat the same steps to create another one with Ting-Ting as voice.

Speak Text by Your Service


After you create above services from Automator, it is ready to let Mac to read text for you. First, you select a selection of English text. Then right click on the selection to bring up context menu. Click on Services and find out your service. For example SpeechByAlex.


Saturday, January 14, 2017

New Year Start: Photo and iMovie

2017 is here. One import thing I recommend to do for your Mac is to create new libraries for your both Photos and iMovie apps.

We import most of our photos and movies, medias, to Photos and iMovie apps. Do you realize that there are too many medias in Photo or iMovies. This is a problem. At least too many medias would slow down your Mac performance. Another risk is that if any thing wrong to cause library messed up or unable to open, years of memory may not recoverable.

My personal preference to create a new library for my medias. At the start of new year, I create a new one and continue to import medias to the new library.

Photos

Normally I place Photos at my Dock. From there, hold Option key and click on Photos. This will bring up open window:


From there you have choice to create new one from Create New... button. Follow convention, create a new library in your home's Pictures folder. Your home is your account name. I name the library as "Photos Library 2017".

iMovie


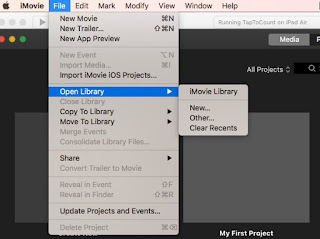
New library can be created from iMovie app itself. From menu, File->Open Library->New...


The default location of iMovie library is at your home's Movies folder. I name the new library as "iMovie Library 2017"


Another benefit to partition your medias in year base is that the library files are much smaller. It makes it much easy to back up photos and movies to your TimeMachine.

After your partition, you can copy or move your previous media libraries to another hard drive. I hope this tip will much Mac life much easier.

By the way, a good practice to add an event in your iCloud calendar at the first date of new year, just remind you a routine work of creating new libraries in your Mac.

Friday, January 6, 2017

Easy Way to Get File/Folder Path

To get full path of a file or folder in Mac is not easy nor straightforward. There is no address field like text in Finder to display the full path when a file or folder is selected. There may be status bar displaying its path but not copiable.

I think that long time ago, in Mountain Lion OS, there was an easy way to get file or folder's path. This could be done in Spotlight. If a file or folder name is displayed in Spotlight, you could copy or cmd+c to get its full path to clipboard.

However, this feature is gone in the current Mac OS. The copy in clipboard is selected pasted-out depending on the target. For example, only the file name is pasted out in most cases, such as in Spotlight, Safari's address bar, or most of text field in other apps. In TextEdit or Pages, the content of the file might be pasted out.

Even though, I figured out that there is a way to get full path: from Terminal!

Terminal is an app that provides text-based access to Mac OS. Terminal has been very old app since Unix. From there you can communicate with Mac OS by various text commands. Here I would not talk about it usage or functions.

We can use Terminal to paste full path! This is very simple:

  1. Open Finder
  2. Either browse to a file/folder, or search for a file/folder from Finder's spotlight
  3. Select a file or folder
  4. Copy it by pressing Command+C
  5. Open Terminal from Spotlight (Command + Space to open Spotlight, type in "Terminal". If you cannot find it, you can locate it in /Applications/Utilities)
  6. In Terminal, press Command+V to paste full path!