Monday, May 5, 2025

Backup iPhone to External Drive

Running out of disk space for iPhone backups is a pain. It's very important to back up your iPhone. Sure, there are some options to do this, such as using iCloud. But for me, I have lots of space on my USB drives, and I'd like to use them for the job.

Finding a solution

On the current macOS (mine is Sequoia 15.3.2), there's no obvious way to change the iPhone backup location in Finder.


After searching online, I found a great solution: using a symbolic link to redirect the backup location to a different path on my external USB drive. It's a really smart trick.

Using Symbolic Links

The ln command is an old but handy command in Unix. I used it often back in university. Basically, it creates a symbolic link that points to another file or directory. It looks like a regular file but is actually a link.

Before doing anything, I needed to locate the original backup path on my Mac and ensure it didn’t contain other important files.

I quickly found the backup folder: ~/Library/Application Support/MobileSync/Backup. I opened Terminal and ran the following commands to check:

  1. MyMac-MBP13:MobileSync auser$ cd ~/Library/Application\ Support/MobileSync/
  2. MyMac-MBP13:MobileSync auser$ ls -a
  3. . .. .DS_Store Backup
  4. MyMac-MBP13:MobileSync auser$

To be safe, I decided to run a test first. As shown above, the only contents are the Backup folder and a hidden .DS_Store file (which can be ignored). So, I created a test directory backupTest in ~/Downloads/:

  1. MyMac-MBP13:MobileSync auser$ mkdir ~/Downloads/backupTest
  2. MyMac-MBP13:MobileSync auser$ ls -a -l ~/Downloads/
  3. total 316496
  4. ...
  5. drwxr-xr-x 2 auser staff 64 22 Apr 20:23 backupTest
  6. ...

Now I created a symbolic link named backupTest pointing to ~/Downloads/backupTest:

  1. MyMac-MBP13:MobileSync auser$ ln -s ~/Downloads/backupTest/ backupTest
  2. MyMac-MBP13:MobileSync auser$ ls -l
  3. total 0
  4. drwxr-xr-x 1 auser staff 26 21 Apr 20:27 Backup
  5. lrwxr-xr-x 1 auser staff 33 22 Apr 20:34 backupTest -> /Users/auser/Downloads/backupTest/

Great! The symbolic link backupTest now points to the test folder. I copied a known file (1.html) to this link and verified the result:

  1. MyMac-MBP13:MobileSync auser$ pwd
  2. /Users/auser/Library/Application Support/MobileSync
  3. MyMac-MBP13:MobileSync auser$ cp ~/Downloads/1.html backupTest
  4. MyMac-MBP13:MobileSync auser$ ls -l ~/Downloads/backupTest/
  5. total 8
  6. -rw-r--r--@ 1 auser staff 4024 22 Apr 20:43 1.html

The pwd command shows the current directory. The cp command copies the file, and the last ls confirms that it reached the redirected location.

Ready to Create the Real Link for iPhone Backup

Now I was ready to create the actual symbolic link for redirecting iPhone backups to my external USB drive. But first, I did two things:

  1. Backed up the existing Backup folder just in case.
  2. Deleted the old Backup directory (after making sure it's empty).

To remove the folder, I used this command:

  1. MyMac-MBP13:MobileSync auser$ rmdir Backup

Next, I identified the name of my external drive (MyUSBDrive) and the folder I wanted to use (iPhoneBackups).

I created the symbolic link and verified the link like this:

  1. MyMac-MBP13:MobileSync auser$ ln -s /Volumes/MyUSBDrive/iPhoneBackups/ Backup
  2. MyMac-MBP13:MobileSync auser$ ls -l
  3. total 0
  4. lrwxr-xr-x 1 auser staff 26 21 Apr 20:27 Backup -> /Volumes/Lachie160/iPhone/

Backup My iPhone

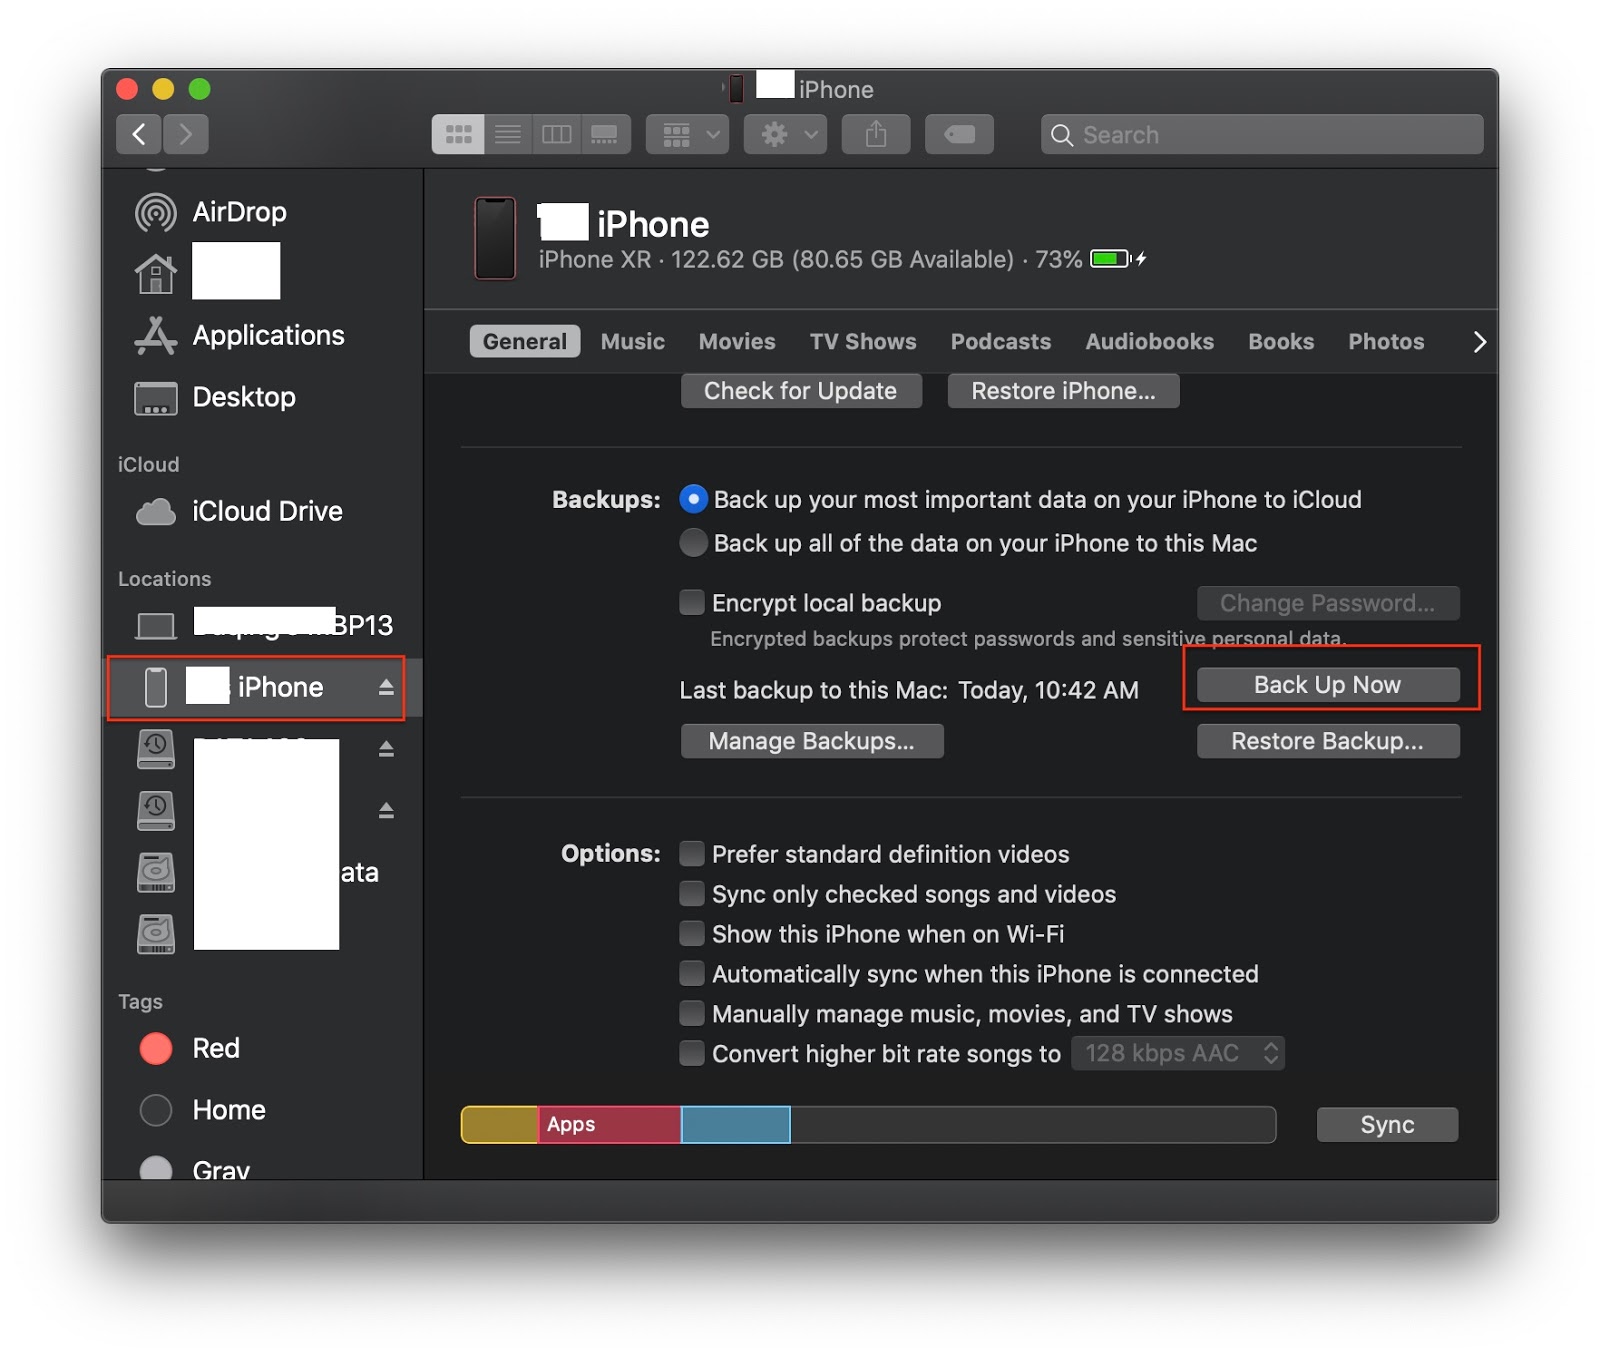
With everything set up, I connected my iPhone and USB drive to my Mac, opened Finder, and clicked the "Back Up Now" button. The backup process started smoothly.

In just 7 minutes, the backup was completed—without any "not enough disk space" error!

References

Other Blogs

Tuesday, April 22, 2025

Fix the "ls: Operation Not Permitted" Error on Mac

Recently, I encountered an issue when trying to execute the ls command in Terminal. This is a commonly used command to display the contents—files and directories—within a specific path. I need to know what's there before I do anything.

ls Error

  1. MyMac-MBP13:~ auser$ ls
  2. Applications Untitled.html
  3. Desktop downloadtemp
  4. Documents iCloud Drive (Archive)
  5. Downloads iCloud Drive (Archive) - 1
  6. Library iCloud Drive (Archive) - 2
  7. Movies test
  8. Music test.aiff
  9. Pictures test.html
  10. Programming tmp
  11. Public vc.swift
  12. Sites
  13. MyMac-MBP13:~ auser$ cd ~/Library/Application\ Support/MobileSync/
  14. MyMac-MBP13:MobileSync auser$ ls
  15. ls: .: Operation not permitted
  16. MyMac-MBP13:MobileSync auser$

After searching online, I discovered that this issue is due to a security enhancement introduced by Apple in the latest macOS: System Integrity Protection (SIP). By default, the Terminal app does not have the privilege of Full Disk Access. My current macOS version is Sequoia 15.3.2.

Change System Settings

According to a solution on the CleanMyMac blog titled “How to fix the ‘ls: .: operation not permitted’ error in Terminal,” I needed to adjust a setting in System Settings.

Initially, when I navigated to Privacy & Security, I couldn’t find the Full Disk Access option.

I wasn’t sure where the setting was—until I tried searching for “Full Disk.”

I turned it on.

The hidden setting was revealed. As expected, Terminal did not have Full Disk Access by default. I enabled it by entering my admin password. Now, the ls command works anywhere in the console, after re-opended.

  1. MyMac-MBP13:Application Support auser$ ls Mob*
  2. Backup
  3. MyMac-MBP13:Application Support auser$

Revert the Setting (Optional)

I believe Apple’s SIP is a great safety feature. After finishing my work in Terminal, I turned off Full Disk Access for the Terminal app to restore the default setting. I’m writing this blog post for future reference, in case I need to do similar work in Terminal again.

References

Other Blogs

Tuesday, March 11, 2025

Process Behind Spotlight

This topic is related to my previous blog on Time Machine Backup Issues

While working on my Mac’s Time Machine backup, I believe I disabled the Spotlight process. Spotlight was indexing my external Time Machine backup drive, which prevented me from resetting and cleaning up the drive.

After resolving my Time Machine backup issue, I realized that Spotlight was no longer working. I could no longer launch applications quickly using Command + Space. It was quite frustrating.

Checking Spotlight Settings

I went to System Settings -> Spotlight, but all the Spotlight settings appeared to be correct. Unfortunately, I couldn’t find an option there to restart Spotlight.

Restarting the Spotlight Process

Eventually, I figured out how to restart the process—the same process I had modified while troubleshooting my Time Machine backup issue. Here’s how you can do it:

Steps to Restart Spotlight

  1. Open Terminal from
    Applications->Utilities->Terminal
    . (Since Spotlight wasn’t working, I had to open it manually.)
  2. Run the following command:
    sudo mdutil -a -i on
    

The mdutil tool is used to manage Spotlight’s indexing process. I realized that I had previously disabled this service, and while I had restored my Time Machine backup, I had not re-enabled Spotlight indexing. That’s why Spotlight was not working.

After running this command, Spotlight started working within minutes. I could once again use Command + Space to launch my frequently used applications, such as Preview, Terminal, MacVim, and Safari.

Spotlight’s Background Process: mds_store

One interesting note about Spotlight’s indexing process is that it is managed by a background process called mds_store. However, when I checked Activity Monitor, I couldn’t find a process with that exact name. It’s possible that the process name has changed, but in any case, the steps above successfully restored Spotlight’s functionality.

If you have disabled this process, you will need to manually enable it using the steps above.

References

Thursday, March 6, 2025

Time Machine Backup Issue

Recently, I discovered that my Time Machine backup to an external hard drive was no longer working. I kept receiving failure messages, but they did not clearly explain the reason for the failure. Eventually, I realized that the available space on the drive was insufficient.

The quickest way to resolve this issue was to erase all backup data on the drive and start a fresh backup from scratch.

Erasing Time Machine Data

The best way to erase Time Machine data from the drive is by using the Disk Utility tool, which wipes out all data and reformats the drive as needed. However, when I attempted to erase the drive, I encountered another failure message. The system reported that the process "mds_store" was preventing the operation (holding the drive).

Following advice from a Google search, I tried terminating the process via Terminal. However, even after killing the process, I encountered the same failure message when attempting to erase the drive again.

Finally, I found a solution! I restarted my Mac in Safe Mode by holding the Shift key during startup. Since Safe Mode runs with minimal processes, I was able to successfully erase the data on the drive by using Disk Utility.

Adding the Drive Back to Time Machine

Once I had the drive ready, another issue appeared—the drive did not show up in the list of available backup drives, preventing me from adding it back to Time Machine.

I recalled receiving a warning message about "Forgetting this drive as a Time Machine backup" when I initially removed the external drive from the Time Machine settings. It seemed that macOS had stored a hidden setting to prevent this drive from being used as a Time Machine backup again. Unfortunately, I wasn’t sure where to change this setting.

Fortunately, I noticed that another partitioned drive appeared as an available Time Machine option. This drive contained important data, such as my picture libraries and historical records. When I selected this drive as a Time Machine backup, the backup process started immediately. However, I did not want to use this drive for backups, so I stopped the process.

One thing I observed was that a Backups.backupdb directory was created on this data drive. I decided to copy this directory to my intended backup drive. To my surprise, after doing this, the drive finally appeared in the Time Machine settings as an available backup option!

Time Machine Permissions

Another interesting discovery was related to permissions on my Time Machine drive.

When I erased and reformatted the drive, the permission settings were as shown in the following picture:

These permissions were the same as those of my data drive. However, when the drive was set up as a Time Machine backup, the permissions changed to the following:

I noticed that I could no longer modify these permissions or add an admin user. If I wanted to copy or erase any data on the drive, I had to enter my admin passwordeach time.

Conclusion

After a long struggle, I finally managed to get my Time Machine backup working again!

Sunday, March 17, 2024

Tips: Caller ID for Phone app

The Phone app is one of the most commonly used iOS apps on the iPhone. You can find a handful of features in the Settings->Phone. For instance, you can configure your caller ID to be either shown or hidden when making a call.

However, occasionally, you might wish to display or hide your caller ID for specific individuals or businesses without having to reset this setting from the Settings menu for every single call, which can be quite laborious. Here are two tips for using the Phone app to achieve this temporarily.

Use the code #31#  before your phone number to hide your caller ID, like in this example:


Use the code *31# before your phone number to display your caller ID, like in another example:


Those codes are very easy to remember. Think of *as a star presenting you, and # as a fence hiding anything. The remaining codes are the same.

Saturday, November 26, 2022

Updated to macVentura 13.0.1

Last night, I updated my macBook Pro macOS to Ventura 13.0.1. I had to to do this because my development tool Xcode 14 is only availalbe for this macOS version. This morning I saw my macOS update is done.

Here is the space difference before and after the update.

Before:


After:


It seems that I got more space after the update.

Thursday, January 6, 2022

Mi Band 4 For Better Health Monitoring

For 2022 New Year, I got a gift of XiaoMi's hand wist device: Mi Band 4 NFC. I have been very interested in Apple Watch for long time. The only things put me on hold are its price and necessity of features I want. This time I got another alternative device to try.

The main interest is its spleep monitor feature. iPhone has a bed time feature in Apple's Clock app. However, it only sets times to the bed and out of bed, ie, bed times. It does not have a way to determin whether if I am really asleep or in deep sleep mode.

Mi Band 4 has a sensor on the back of the watch. This sensor seems being able to monitor my sleep mode: light sleep and deep sleep. The device has an iOS app called Mi Fit. From there I can see my sleep score and data in detail.

The app provides 2 comparisions of my sleep data to other people.

From Heart Rate item in the main screen, the rate information is available from the detail view,

and sleep rate is also avaible from there.

The app also syncs those data back to iOS Health. Unfortunately, it only syncs all light and deep sleep data, back to Health' sleep module as asleep data.

Sometimes, I do see some sleep data duplicated. This might be caused by multiple syncs.

Anyway, I like Mi Band 4 device very much. In addtion to its detail sleep information, it also monitor my heat beat, and movements(walking, running, and cycling). The most important feature is its long lasting battery life, up to 5 days a charge (comparing to Apple Watch 2 days for the most recent model).

UPDATE

I found another trick to record my awake time. When I awake in a night, for example, going to washroom, I shake my left hand with Mi Band on up and down 10 times. I think that this is the way to let the band detect I am really awake. I have tried sever nights, and it is accurate to record my awake time.

In terms of price, Mi Band 4 is about $40.00 on Amazon.ca as to the blog date.

Thursday, December 30, 2021

Secret Cache of WeChat

By chance, yesterday when I clicked on a message with a link to a document file in Mac's WeChat app, I was prompt to Finder. To my surprice, this is a deep and secret space where WeChat stores temporary files.

Further exploration, I found its path from file info in Finder.

From there I copied the full path from Where. Here is the full path
/Users/xxx/Library/Containers/com.tencent.xinWeChat/Data/Library/Application Support/com.tencent.xinWeChat/2.0b4.0.9/f5210b300b4abef170762c8c1ddf67c5/Message/MessageTemp/2d14efe546045554426bdf707c13cead

I understand that WeChat saves some information such as images, files, videos in local cache so that there would be no need to download those information again for displaying (and much qicker) when user clicks on thos items. However, I don't know where they are and how long those items are stored, forever?

From this sneak, I could go up to other folders to see what items are saved. There are quite a lots of items in this library cache. I guess that those items would be purgeble items in system cache.

Tuesday, December 28, 2021

I got Mac mini M1

I just got Mac mini M1 2020 model, refurblished one. I have been kept watching Mac mini M1 for long time. The Mac mini box is very small, powerful, and attactive Mac computer. In addition to that, the cost is another reason, much less that iMac or macBook air or pro. This model saves me CAD$170.

This is my first expirence with Mac mini. Basically, it is just computer box with powerful CPU & GPU, internal speaker and several ports for peripheral connection. To make it work in a way as same as iMac, for example, a monitor, a keyboard, mouse or trackpad are needed as minimal.

In addtion to the minimal, for my case, I purchased a web camera for facetime or web conference. I have an external speaker with better sound quality. The Mac mini box does not have any internal microphone, but I found that web camera's microphone is good enough. There are 2 USB ports in the mini box. I need more ports for my keyboard, mouse, web camera, extrenal HD as time machine, and printer. Therefore, I need two USB hubs (4 USB ports for one hub) for more connections.


For my experienment, I tried to use USB port to connect the Mac mini to my existing iMac 21, using iMac screen as monitor. I thought that if I could see Mac mini HD, I would be able to boot from it through System Preferences' boot disk setting. Unfortunately, I cannot see Mac mini HD from my iMac. Finally I realize that it makes sense. The HD within Mac mini box is not in the same way as external HD to USB port. Any way, it is a good try. Currently I have an old monitor for use. The new one, Samsung 24" FHD 75Hz 5ms GTG IPS LED FreeSync Gaming Monitor (LF24T350FHNXZA), is on the way shipping to my house.

References

Friday, November 26, 2021

Add Picture to PDF File

Preview is a versatile tool to view and edit various types of files, including PDF. For example, by using Preview, you can add new text, lines, object shapes to a PDF file. However, it seems, at first,  that images could not be directly added to PDF file(no ways from Previews' menu or toolbar icons), none be directly pasted to.


Just a shorting time searching from internet, I found a way to do that.  Here is the trick to do that:
  1. First copy and paste an image to Preview by Ctrl+N as a new image file;
  2. then select all or part of image and make a copy (Ctrl+C).
  3. Paste the selection by Ctrl+V.
  4. Select all again (Ctrl+A), and
  5. cut the selection(Ctrl+X). This new copy will be as an object instead of image.
  6. The last step is to paste the object to your PDF file in Preview by Ctrl+V!

References

Monday, April 13, 2020

Link to a note in Notes.app

Notes.app is a very good app in Apple eco-system. You can add a note on Mac or iPhone or iCloud. Then all the notes are synced in iCloud if you enable notes on iCloud.

There is a problem to access to a note, especially when you have hundreds or thousands of notes. It is really hard to find out an interested note.

I developed an app: TapToCount-3W. This is a convenient and creative tool to write notes anywhere when you have an iPhone. By categories you define, it is very easy to organize your taps or notes. With a finger tapping on screen, you can create a tap with 3 pieces information: When, Where and What. "What" is a note associated to a tap.

Normally, I don't like to write a lot of text in my app's note. It is much better to use Notes.app or EverNote to write a note. Then, a question comes to my mind. Can I have a URL link in a note, and then I copy/paste the link to my app.

Yes, it is possible. Just follow these simple steps:

  1. Click or tap a note's Add People icon
  2. Enter an email, it can be just you!
  3. Then a link is available in Sharing. I could not find Copy Link in iPhone, but it is in Mac.


In this way, I can have a link in my app.


From this story, I think that any shared resources in Apple devices should have a link or URL available for accessing.


References


Sunday, January 19, 2020

Remove Sunflower Sound Source Drive

I installed Sunflower sound drive long time ago. From System Preferences or Sound source list, 2 soundflower items are displayed. Since this sound source is not working well in Mac OS Catalina, and I have never used it as audio output, I need to remove them.

I found that sound items were installed as extensions to Mac. I don't have original package with uninstaller, hence, I have to manually remove them. Here are steps I found:


  1. Open Terminal
  2. Change folder to /Library/Extensions

    cd /Library/Extensions

  3. Check soundflower is there with command

    ls Soundflower.kext

  4. Remove it with the command

    sudo rm -rf Soundflower.kext

  5. Reboot
After reboot, soundflower items are no longer in audio output list.

One more interesting I found that in the folder of /Library/StagedExtensions/Library/Extensions/, I can still see Soundflower.kext file there, but I cannot remove it with above command. Anyway, the removal seems working fine in terms audio output list, I don't bother to figure out how to remove it from the second place.

Wednesday, January 8, 2020

Connect to Wifi with QR Code

When you go to a new place, such as friends house, hotel, restaurant, airport, public place. One thing you want to find out is if there is Wifi network available? For free Wifi, it is quite easy to make connection. If a password is requite, you have to get it and enter it with your fingers, not so easy when password is long and complicated.

Recently, I read a news about NFC tag to access to Wifi. It is quite easy. You can move your phone to  a nearby NFC tag to access to Wifi. This intrigues me to a related tech: QR code. Soon I find out it is possible. Here are my findings.

Create Wifi QR Code


The first step is to create a Wifi QR Code. The most convenient way is to go to the web site qifi.org. You need to provide following information to generate a Wifi QR code:


where, SSID is a Wifi name, Key is a password, and the choice of Encryption is normally WPA/WPA2. With those information entered, you can generate Wifi QR code by clicking on "Generate!"


In addition to this web service, there are many free apps available on mobile phones. I tried some and some claimed to provide Wifi QR code. However, all my tests were failed. Another thing is that most of apps actually requite Internet access. Maybe they get QR code from online QR services in background. That makes sense. Otherwise, those app would include considerable QR library, which takes some extra space.

From my exploration, I find out the above web service is the most notable and reliable.

Scan QR Code


With Wifi QR code ready, you can use it as a way to easy access to Wifi network. You can save the Wifi QR code image to your mobile phone, or print it out and hanging out on your refrigerator. You can also leave it on your computer/mobile's web browser for people to scan.

Here is a tip. When you cut the QR code, add a title on the top of the image. This makes it easy to recall what this QR code is. There are many other usages of QR codes.


For iPhone users, it is very easy to access to Wifi network just by pointing Apple's Camera app at the code. In photo mode, there is a popup message on the top when you focus on the image:


Tap on the message, another popup window with options is displayed.


Note: your iPhone should be iOS 11 or above. If not showing this popup message, check your Setttings-Camera:


There are many QR Reader apps on iPhone, some claiming support for Wifi code. However, I tried many of them, none of their generated Wifi QR codes is working. Therefore, I choose qifi.org as my best choice.

Another interesting thing about iPhone is that you cannot use any third party apps to access to Wifi automatically by scanning QR code(I'll explain it later). All the QR code reader apps can read Wifi QR code and display its content as text. The following is an example:


If you cannot access to Wifi network automatically, you can still use QR reader app to get all the information, copy the password, and manually set your Wifi access.

For Android users, QR reader apps are requited. Based on the recommendation of qifi.org, two apps are listed in the following section of References.

Security Concerns


Although Wifi QR code techology provides a convenient and quick way to access Wifi network, it also introduce security vulnerability. This is my understanding. A Wifi QR code contains all the information about access to Wifi network. If an app could read all those information and request change of Wifi network without user content(in background, for example), it could change user's network environment without user notice. This would open security hole for hackers to steal user's mobile information, to install evil apps or to monitor user activities.

In this regard, iPhone is doing better. None of any none-Apple apps can do Wifi change automatically. Even for Apple's Camera app, it still displays a message to let user aware what's happening.

Another interesting thing I found is to memorize Wifi settings. I use iPhone. If I manually set up my home Wifi access, for example, my iPhone would remember my home Wifi settings. Next time when I come home, it would atomically reconnect me back to my home Wifi.

However, if I use Wifi QR code to access to home Wifi network, my iPhone will not remember those settings. The next time I am back to my home, my iPhone would not reconnect me back. I have to retype my password again for my home Wifi access.

This may be good for some people if they do not want to let users' iPhone to remember Wifi settings.

If you want your iPhone to remember those settings and want to use Wifi QR code, I found a secret. In the above qifi.org web page, there is an option "Hidden". Check this box and generate QR code. This will make your iPhone to remember Wifi settings!

References


Saturday, December 28, 2019

Manage Safari's Favorites

If you tap or press cmd+L keys in Safari, you will see a dropdown list of icons. Sometimes, you may find some icons aren't valid or you don't need, or, you may want to add some weblinks there. How can you manage those icons?


I found one article about how to remove some icons from the list(just drag one out of the list), but it does not mention how to add new.

If you pay attention to those icons, you would find out they are listed in several groups, first one Favorites, second Frequently Visited... Actually, they are all in Safari's Bookmarks. Soon I found a simple way to add. Just select from menu Bookmarks | Add Bookmark...,


a prompt window will show where to add, and what text will be displayed for the current view webpage,  by default to Favorites.


Further explore, I found that Edit Bookmarks from menu is the place to reveal all the information of icons displayed in address dropdown list window.


References

Tuesday, December 10, 2019

Live YouTube with OBS

I recently got a request from a group of my friends to do a live streaming on YouTube. I did this long time before on my Mac. I thought that it should be easy, even though I still decided to do preparation one week ahead of time. I could not get it to work at start. I have spent several days struggling to figure out how to stream video and audio to YouTube. Finally, I got it work. Here I would like to make some notes on this experience.

What I need for Live Streaming


YouTube raised bar to do live streaming for mobile devices, at least 1,000 subscribes for the time being (Dec 10, 2019). I have to do it with software on my Mac. Here is the list I have to set up:

  • Live streaming software: OBS (Open Broadcaster Software);
  • Web camera as movable camera to shoot: EpocCam for iPhone to shoot, and EpocCam View on Mac to receive video from EpocCam on iPhone;
  • External microphone for audio recording.
and of course, YouTube account is requested to do live streaming. Another thing is that Chrome is required to run Live YouTube, since Safari does not support some features by Live Y.

iPhone as Web Camera


EpocCam iPhone Webcam Viewer is a Mac app, which can be obtained from App Store. On iPhone side, you can also get EpocCam iOS app. In order for Mac to get video source, run the iOS app first, and then run the Mac app on my Mac computer. Both should be on the same network. This is very easy and straightforward step up.


OBS Configuration for Video Source

OBS installation is very easy as well. For Catalina OS, you may experience some issue to run the installation package since it is not from from App Store. Open System Preferences | Security & Privacy, and you will see in General tab that installation... for permission.

Catalina OS has more security features, thereafter, capturing screen/windows, and accessing to a mic have to be permitted by user.

The first difficulty is to get video source for OBS streaming. After one or two days's investigation I eventually found a way to get video source: window capturing. This can be set by adding video source from source panel:


EpocCam running window can be found in window list:


OBS Configuration for Audio Source

The most difficult one is to configure audio source. Before set it up, the following app should be installed first:

iShowU Audio Capture

Basically, this app is used to install a driver as extension to OS X so that it can used as a way to capture audio on Mac computer. The installation process requires to give permission from System Preferences | Security & Privacy.

The next step is to set up audio output device by running Mac utility app: Audio MIDI Setup. Add a new Multi-output Device from left panel:


above is the case of Multi-Output Device with iShowU Audio Capture and Built-in Output checked.

Remember: each time start a live OBS streaming, make sure this Multi-Output Device is selected as output device either from System Preferences | Sound Output tab, from top right Speaker icon:


or


The final and very important step is to start OBS from Terminal with the following command(audio capture would not work if launching OBS directly from Applications!):

open /Applications/OBS.app/Contents/MacOS/OBS --args -picture

When you first time to run this command from Terminal, you will get permission prompt to let this shell to access mic. I think that access to microphone is done by running OBS with argument settings from Terminal. You can verify it by looking at Audio Mixer penal on OBS window's bottom.

Don't close Terminal during live streaming period!

This is my OBS settings for Audio:


The above are all my findings after several days and long hours struggling. I am very happy to get all the issues resolved.

I wrote this blog for my future reference and hope it may help you with similar difficulties.

References

Sunday, December 8, 2019

Watch AppleTV on AppleTV Device

Recently I joined Apple TV subscription by using family sharing. I can watch AppleTV content on my iPhone and Mac computers. However I could not watch the content on my AppleTV device straight through AppleTV app(TV app in short). On my other devices, I can watch TV content when I open TV app since I use the same AppleID with family sharing setting. On my AppleTV device, when I open the TV app, I get prompt to sign in with password for my AppleID. There is no problem to sign in, but I see Trial icon which is not showing on my other devices.

I could mirror or redirect content from my other Apple devices to my big TV screen, but it is painful to watch high resolution TV streaming in this way, always stuck or spinning wheels on screen. My device is 3rd generation one.

After several days trying and investigation, I could not find solution. I decided to get help from Apple. I found Apple support from web. I clicked on call support link from my AppleID page, I was told that Apple support would call me directly. That's new and interesting. Indeed, I got a call from Apple in no time. It was about 8pm on Saturday night.

I explained my issue. The support person actually was not the right one for this issue, but I was forward to multimedia streaming support department.

Solution: Password+Passcode


To cut the story short, the solution is very simple. In the sign in prompt when I open TV app, I was told to type in my AppleID password plus passcode. The passcode can be get from my iPhone. In settings, tap on my name, then Password & Security. Scroll down there is Get Verification Code link to get passcode.

That's very wired and so simple. This requirement is one time. After that, I don't see Trial icon and no need to sign in again. Now I can enjoy my AppleTV content straight from my AppleTV device!

Friday, November 15, 2019

iPhone Backup in Catalina


Before I updated to Mac OS Catalina, I do regular backup of my iPhone through iTunes. Today it is time to back up. Soon I realize iTunes is not working in Catalina! Maybe it is 32bits app.


Quickly I find out how to do backup of iPhone in Catalina: using Finder.

Connect iPhone to Mac first. Unlock iPhone and then it will appear on the left panel of Finder. In General tab, more detail information of how to backup iPhone is available.

Thursday, November 14, 2019

iCloud Continuity

One of iCloud Continuity features is copy/paste. I like this very much. I could type in text on my Mac, then make a copy. With this continuity, I could paste text easily on my iPhone.

However, my recent Mac update from MB Air to MB Pro. I could have this feature to work on my new MB Pro. I tried to search for solutions on web but with no luck.

Apple Support


Today, I decided to get help from Apple. All of my Apple devices are out of Apple Care warrantees, MBP is 2017 and iPhone is XR. I thought that my issue is Mac OS update related issue, I may be able to get help from Apple, based on my previous experience from Apple support.

I phoned 1-800 line. Not waiting for long, I got a real person helper. I told him my story and also mentioned that I have turned on Wifi same network and Bluetooth. That saves him time to investigate issues. He put me on hold to search for support information.

It seems that there is no need having Apple Care to get Apple's support. My case is OS ie iCloud service issue. That's really nice service from Apple.

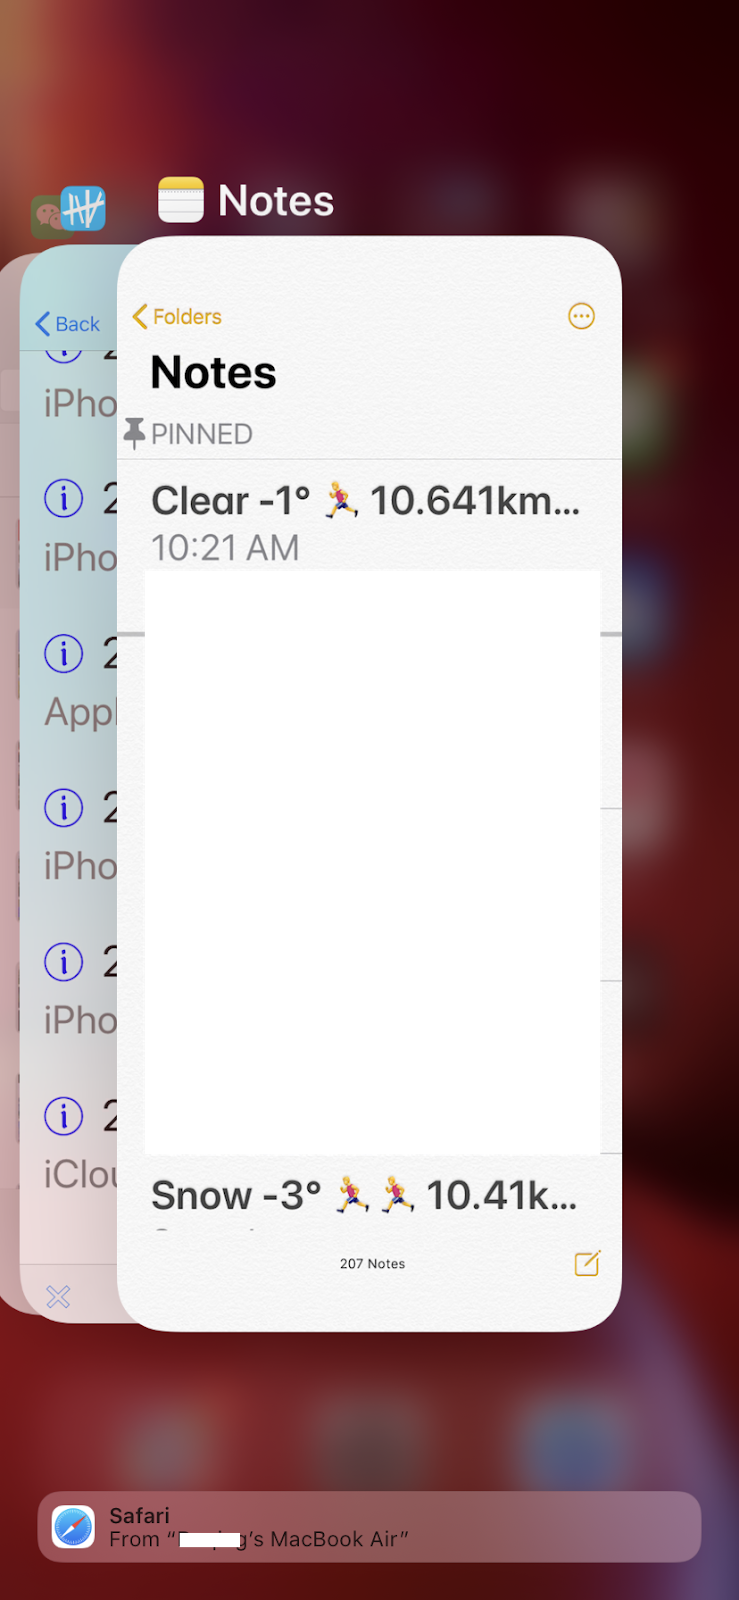
While the waiting time, I tapped my iPhone on bottom and swipe up to get active apps. I noticed that on the bottom, Safari with a message saying to my MBA. I realized that my iCloud might be paired to my iPhone and my previous MBA!


I took my MBA out and turned it on. I tried to copy something text there. Then I got the text pasted on my iPhone. It works, but no my updated MBP.

The helper was back. I told him my findings. I said, it might be my iCloud service is paired between iPhone and MBA. Is there any way to find out this pairing and change it to my MBP? I asked.

To cut story short, he said that it is beyond his knowledge to solve the issue. He has to pass it to senior person to provide solution.

Solution for iCloud Continuity and Universal Clipboard


The second helper was a lady. She remotely accessed to my Mac. Quickly with her investigation and suggestions, I finally get Continuity and Universal Clipboard working!

She asked me to restarted my iPhone and Mac first. I said I tried that, still not working. Then she told me to sign out my iCloud from my iPhone (General | My Apple ID... | Sign Out). Then restart my iPhone, sign in again.

It took a while to get all the data back from iCloud. She told me to log on my MBP. I opened my Notes app. I tried to type something there. Quick I saw the changes are reflected on my iPhone. This part is working.

However, the universal clipboard is not working, still I cannot paste text copied on my Mac.

She continued to investigate my Mac. From System Preferences, in Profiles, she found some malware on my Mac! That's amazing, first time found malware on Mac, from Apple support.


She told me to press "-" to remove them first. Then She told to get a tool to remove it from my Mac. The tool is from malwarebytes.com. That's another surprise for me, using third party app to kill malware. I was hesitated, but I followed her suggestion.

I downloaded the installation package from malwarebytes.com, installed it, then opened it. She told me to scan first. TopicSearch was found in system library. Final step was to remove it. If I was convinced my 1-800 number is correct, I would not do that.

After I restarted my Mac again. I gave copy/paste a try in Notes app. Finally, it was working. The problem was resolved!

"Thank you very much, your Apple support is super!" I finally told her. She smiled.

My Understanding of iCloud Continuity


After everything is working between my iPhone and new MBP. To my surprise, my MBA also keeps working iCloud. I tried to copy of an image in MBA, and I could paste it in my MBP and iPhone!

Based on this experience, my initial understanding of iCloud Continuity was not correct. It is actually not pairing of iPhone and another device such as Mac. It is the continuity among all iCloud based devices.

I think that initially I configured the continuity feature in both iPhone and MBA. Somehow, my when I later added my MBP, the cached configuration did not pick the new device automatically. As Apple helper did, I had to sign out iCloud from my iPhone and sign in again. All devices I set up in my iCloud them are recognized.

It is really cool to see iCloud continuity working among all Apple devices.

References


Apple Support Line in my iOS app. I made a record by a tap in my app with following note:


I saved all my Apple related stories, activities & events in TapToCount-3W app. It makes me easy to recall and find contact information.

Malwarebytes: How to install Malwarebytes

Wednesday, October 23, 2019

iCloud Unknown Error

Recently I updated my Mac OS to Catalina when I got MacBook Pro 2017. Initially, I transferred my OS and data by using Time Machine. Then updated OS from Mojave to Catalina.

The first thing I realize was iCloud error: I could not make connection to my iCloud. The error message is "An unknown error occurred".

I tried to search for solutions on web. I could not find a good way to resolve it. I tried to ask Apple on-line help. They could not resolve it neither. At the end of the help, an senior manager asked to reinstall Mac OS by press Command + R key during restart. It took long time, about 2 hours to reinstall OS. Still I had the same issue after OS update.

The issue looks like something wrong within my user account and OS. It did not reach out to iCould service. I verified my iCloud in Safari, and it works fine.

Finally, I found a suggestion from an article on web (actually, the solutions in the article do not work, and only one in the comments is working). It recommends to clean my keychain folder. I was hesitant to take this strategy since I was worried about I could lose all my password and certificate settings. I spent several days already and with no luck. I decided to give it a try.

Here is the keychain folder I have to clean:

~/Library/Keychains/

After clean up, I did not see this message again. It took very long time complete the setup. Fortunately, I had my keychain in iCloud. After the process, my most passwords are recovered from my keychain in iCloud.

References


Tuesday, February 26, 2019

Open Attachment Winmail.dat in Mail App

This is quite annoying issue. I frequently receive emails from Windows platform with attachment. The attachment file is displayed as Winmail.dat file in Mail on Mac side. The dat extension name cannot be correctly identified on Mac.

Further search on web, I realize that this is a command issue. Today I found a simple solution to get the issue resolved. What I need is an app called TNEF's Enough. This is a free app and now available in App Store.

With this app, open the saved attachment file Winmail.dat. It will reveal the type of file hidden within the dat. Double click will prompt a Window to save the revealed file.


References