Showing posts with label iPhone. Show all posts

Monday, May 5, 2025

Backup iPhone to External Drive

Running out of disk space for iPhone backups is a pain. It's very important to back up your iPhone. Sure, there are some options to do this, such as using iCloud. But for me, I have lots of space on my USB drives, and I'd like to use them for the job.

Finding a solution

On the current macOS (mine is Sequoia 15.3.2), there's no obvious way to change the iPhone backup location in Finder.


After searching online, I found a great solution: using a symbolic link to redirect the backup location to a different path on my external USB drive. It's a really smart trick.

Using Symbolic Links

The ln command is an old but handy command in Unix. I used it often back in university. Basically, it creates a symbolic link that points to another file or directory. It looks like a regular file but is actually a link.

Before doing anything, I needed to locate the original backup path on my Mac and ensure it didn’t contain other important files.

I quickly found the backup folder: ~/Library/Application Support/MobileSync/Backup. I opened Terminal and ran the following commands to check:

  1. MyMac-MBP13:MobileSync auser$ cd ~/Library/Application\ Support/MobileSync/
  2. MyMac-MBP13:MobileSync auser$ ls -a
  3. . .. .DS_Store Backup
  4. MyMac-MBP13:MobileSync auser$

To be safe, I decided to run a test first. As shown above, the only contents are the Backup folder and a hidden .DS_Store file (which can be ignored). So, I created a test directory backupTest in ~/Downloads/:

  1. MyMac-MBP13:MobileSync auser$ mkdir ~/Downloads/backupTest
  2. MyMac-MBP13:MobileSync auser$ ls -a -l ~/Downloads/
  3. total 316496
  4. ...
  5. drwxr-xr-x 2 auser staff 64 22 Apr 20:23 backupTest
  6. ...

Now I created a symbolic link named backupTest pointing to ~/Downloads/backupTest:

  1. MyMac-MBP13:MobileSync auser$ ln -s ~/Downloads/backupTest/ backupTest
  2. MyMac-MBP13:MobileSync auser$ ls -l
  3. total 0
  4. drwxr-xr-x 1 auser staff 26 21 Apr 20:27 Backup
  5. lrwxr-xr-x 1 auser staff 33 22 Apr 20:34 backupTest -> /Users/auser/Downloads/backupTest/

Great! The symbolic link backupTest now points to the test folder. I copied a known file (1.html) to this link and verified the result:

  1. MyMac-MBP13:MobileSync auser$ pwd
  2. /Users/auser/Library/Application Support/MobileSync
  3. MyMac-MBP13:MobileSync auser$ cp ~/Downloads/1.html backupTest
  4. MyMac-MBP13:MobileSync auser$ ls -l ~/Downloads/backupTest/
  5. total 8
  6. -rw-r--r--@ 1 auser staff 4024 22 Apr 20:43 1.html

The pwd command shows the current directory. The cp command copies the file, and the last ls confirms that it reached the redirected location.

Ready to Create the Real Link for iPhone Backup

Now I was ready to create the actual symbolic link for redirecting iPhone backups to my external USB drive. But first, I did two things:

  1. Backed up the existing Backup folder just in case.
  2. Deleted the old Backup directory (after making sure it's empty).

To remove the folder, I used this command:

  1. MyMac-MBP13:MobileSync auser$ rmdir Backup

Next, I identified the name of my external drive (MyUSBDrive) and the folder I wanted to use (iPhoneBackups).

I created the symbolic link and verified the link like this:

  1. MyMac-MBP13:MobileSync auser$ ln -s /Volumes/MyUSBDrive/iPhoneBackups/ Backup
  2. MyMac-MBP13:MobileSync auser$ ls -l
  3. total 0
  4. lrwxr-xr-x 1 auser staff 26 21 Apr 20:27 Backup -> /Volumes/Lachie160/iPhone/
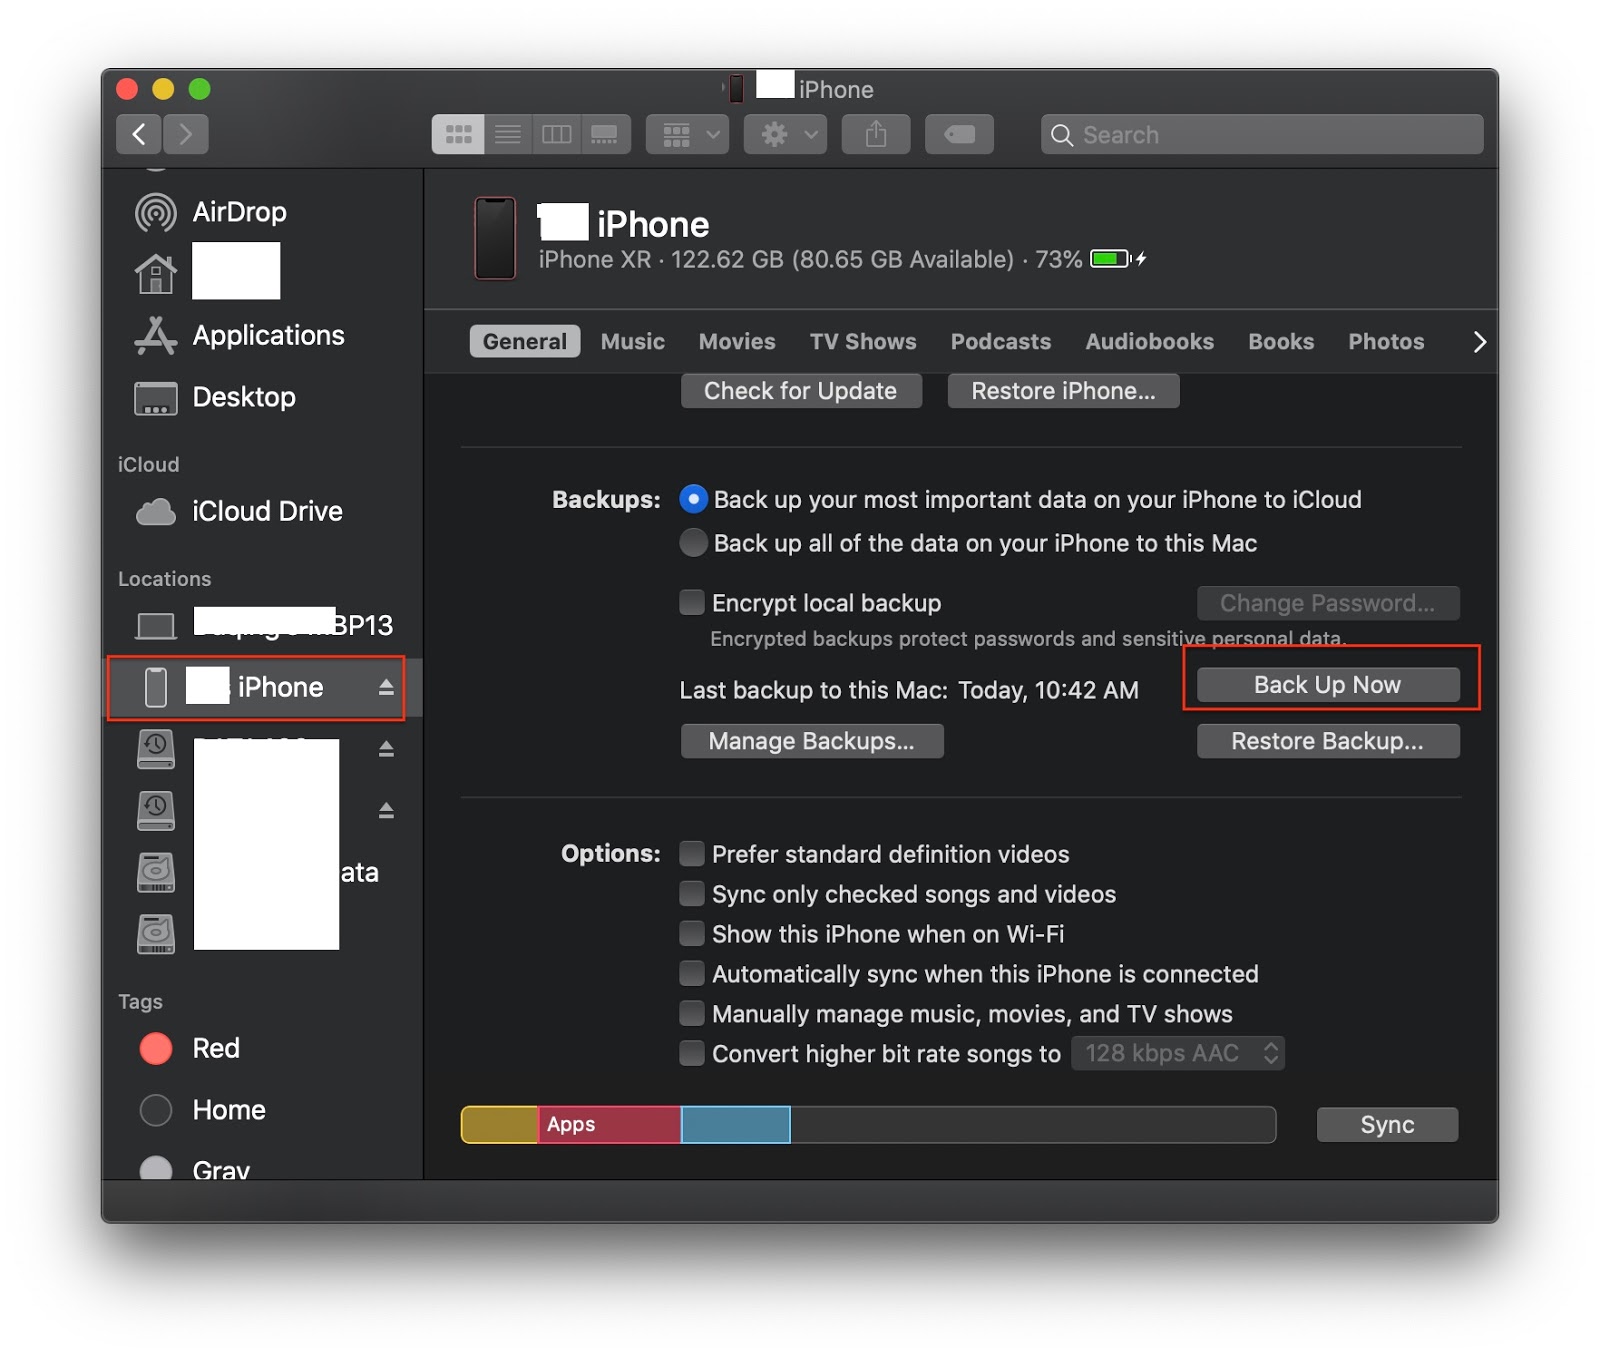
Backup My iPhone

With everything set up, I connected my iPhone and USB drive to my Mac, opened Finder, and clicked the "Back Up Now" button. The backup process started smoothly.

In just 7 minutes, the backup was completed—without any "not enough disk space" error!

References

Other Blogs

Sunday, March 17, 2024

Tips: Caller ID for Phone app

The Phone app is one of the most commonly used iOS apps on the iPhone. You can find a handful of features in the Settings->Phone. For instance, you can configure your caller ID to be either shown or hidden when making a call.

However, occasionally, you might wish to display or hide your caller ID for specific individuals or businesses without having to reset this setting from the Settings menu for every single call, which can be quite laborious. Here are two tips for using the Phone app to achieve this temporarily.

Use the code #31#  before your phone number to hide your caller ID, like in this example:


Use the code *31# before your phone number to display your caller ID, like in another example:


Those codes are very easy to remember. Think of *as a star presenting you, and # as a fence hiding anything. The remaining codes are the same.

Wednesday, January 8, 2020

Connect to Wifi with QR Code

When you go to a new place, such as friends house, hotel, restaurant, airport, public place. One thing you want to find out is if there is Wifi network available? For free Wifi, it is quite easy to make connection. If a password is requite, you have to get it and enter it with your fingers, not so easy when password is long and complicated.

Recently, I read a news about NFC tag to access to Wifi. It is quite easy. You can move your phone to  a nearby NFC tag to access to Wifi. This intrigues me to a related tech: QR code. Soon I find out it is possible. Here are my findings.

Create Wifi QR Code


The first step is to create a Wifi QR Code. The most convenient way is to go to the web site qifi.org. You need to provide following information to generate a Wifi QR code:


where, SSID is a Wifi name, Key is a password, and the choice of Encryption is normally WPA/WPA2. With those information entered, you can generate Wifi QR code by clicking on "Generate!"


In addition to this web service, there are many free apps available on mobile phones. I tried some and some claimed to provide Wifi QR code. However, all my tests were failed. Another thing is that most of apps actually requite Internet access. Maybe they get QR code from online QR services in background. That makes sense. Otherwise, those app would include considerable QR library, which takes some extra space.

From my exploration, I find out the above web service is the most notable and reliable.

Scan QR Code


With Wifi QR code ready, you can use it as a way to easy access to Wifi network. You can save the Wifi QR code image to your mobile phone, or print it out and hanging out on your refrigerator. You can also leave it on your computer/mobile's web browser for people to scan.

Here is a tip. When you cut the QR code, add a title on the top of the image. This makes it easy to recall what this QR code is. There are many other usages of QR codes.


For iPhone users, it is very easy to access to Wifi network just by pointing Apple's Camera app at the code. In photo mode, there is a popup message on the top when you focus on the image:


Tap on the message, another popup window with options is displayed.


Note: your iPhone should be iOS 11 or above. If not showing this popup message, check your Setttings-Camera:


There are many QR Reader apps on iPhone, some claiming support for Wifi code. However, I tried many of them, none of their generated Wifi QR codes is working. Therefore, I choose qifi.org as my best choice.

Another interesting thing about iPhone is that you cannot use any third party apps to access to Wifi automatically by scanning QR code(I'll explain it later). All the QR code reader apps can read Wifi QR code and display its content as text. The following is an example:


If you cannot access to Wifi network automatically, you can still use QR reader app to get all the information, copy the password, and manually set your Wifi access.

For Android users, QR reader apps are requited. Based on the recommendation of qifi.org, two apps are listed in the following section of References.

Security Concerns


Although Wifi QR code techology provides a convenient and quick way to access Wifi network, it also introduce security vulnerability. This is my understanding. A Wifi QR code contains all the information about access to Wifi network. If an app could read all those information and request change of Wifi network without user content(in background, for example), it could change user's network environment without user notice. This would open security hole for hackers to steal user's mobile information, to install evil apps or to monitor user activities.

In this regard, iPhone is doing better. None of any none-Apple apps can do Wifi change automatically. Even for Apple's Camera app, it still displays a message to let user aware what's happening.

Another interesting thing I found is to memorize Wifi settings. I use iPhone. If I manually set up my home Wifi access, for example, my iPhone would remember my home Wifi settings. Next time when I come home, it would atomically reconnect me back to my home Wifi.

However, if I use Wifi QR code to access to home Wifi network, my iPhone will not remember those settings. The next time I am back to my home, my iPhone would not reconnect me back. I have to retype my password again for my home Wifi access.

This may be good for some people if they do not want to let users' iPhone to remember Wifi settings.

If you want your iPhone to remember those settings and want to use Wifi QR code, I found a secret. In the above qifi.org web page, there is an option "Hidden". Check this box and generate QR code. This will make your iPhone to remember Wifi settings!

References


Friday, November 15, 2019

iPhone Backup in Catalina


Before I updated to Mac OS Catalina, I do regular backup of my iPhone through iTunes. Today it is time to back up. Soon I realize iTunes is not working in Catalina! Maybe it is 32bits app.


Quickly I find out how to do backup of iPhone in Catalina: using Finder.

Connect iPhone to Mac first. Unlock iPhone and then it will appear on the left panel of Finder. In General tab, more detail information of how to backup iPhone is available.

Sunday, September 10, 2017

Do you know your sleep patten?

If you ask me this question several weeks ago, I would shrug and could not tell you anything. Normally I would go to bed when I feel really exhausted. I have no problems to sleep and would go all the way to the next morning or the time I have to go to washroom. However, my sleep may be interrupted by some sudden events or some thoughts causing me awake hardly back to sleep. If this kind of things happen more, it may indicate my health status in downhill.

I know that sleep is very important in terms of health. With mobile technology in past years, I notice that many mobile device or sensors could tracing sleep pattern. However, I have been very hesitate to purchase one just for monitoring my sleep pattern.

Until recently, an icon in Clock app caught my attention. There is a new icon in the tool bar in the Clock app. The icon is a bed. Soon I found out this is called as BedTime, something related to sleep. After my initial investigating, I really love this simple and elegant app.

How to open BedTime

Normally I open Clock from Control Centre, swapping from bottom up. Clock is one of most commonly used apps, finding world time and setting up alarm.


The BedTime is right in the middle of bottom tool bar.


The first time open this app, you will go through several steps to set it up. I think you don't need to bother about details of each setting, just accept the default settings. You will be able to change those settings when you know how to use it. Here is the main screen of BedTime.


The Options on the top left corner is the place you can change settings.

Use BedTime

The interface of BedTime is very simple. The yellow circle arc indicates sleep time, one end as to bed time and another as up time or alarm time. You can tap on either end and drag to a time as your wish. The number in the middle shows the duration of bed time.

If you want to keep certain number bed time time, for example 8 hours, you can set up both ends first, and then drag the yellow circle to adjust both to bed time and up time with bed time unchanged.

After your setup, you may get a notification before bed time, 15 minutes as default. At up time, alarm will wake you up. I find out this is really good replacement of alarm.


You can tap on Stop or open your iPhone with a tap on Home or on Stop button.

Note: there is a separate volume control for alarm in BedTime's Options.

Tips and Tricks

You can enable/disable Bedtime time on certain days within a week. There is only one setting for bed time and up time. You cannot set different times for difference days within a week. Fortunately, I know well about when I should be up the next day. So I set up my bed time and up time every day to guaranty my sleep time. I think it is good to set up bed time every day so I keep more attention to my sleep.

As iOS ecosystem, BedTime is integrated with Health app. All the history bedtimes are saved to Health Sleep section.


From Health, you will see more detail about your sleep data, as well as deleting and adding data.

One interesting thing about BedTime is that this app is smart enough to know when you are awake. If you touch your iPhone during bedtime to open it, that active moment is marked as one end of bedtime, and the next inactive moment would be marked as another in-bed time. This is really good if you have to get up do something, for example washroom. You will be able to see your sleep pattern in more detail in Health Sleep section.


If you manually add sleep time from Health, you will set three types of sleep data.


Notice that the time from BedTime saved to Health Sleep section is "In bed". There are other two times: Asleep and Awake. Indeed, there is no connection to any sensors in BedTime can tell if you are in asleep. This app is a simple one to let user to set up bed time and up time. Therefore, it will be up to user to make accurate adjustment in order to trace user's sleep pattern.

After weeks use, I really like this new feature in Clock. At least there is a way to let me know my sleep pattern, at least very close to (actually it records in bed time). BedTime also let me know if I have enough sleep time so that it would motive me to pursue a heathy life style.

Thursday, April 13, 2017

Get Media from iOS Devices to Mac

There are many ways to get photos or movies from iOS device to Mac. For example, using Photos, iMovie or iTunes apps. However, those methods would place media into app's libraries. Sometimes, I may use another Mac or friends Macs where I don't want to save my media.

Here I recommend two methods to do that.

Image Capture


Image Capture is an app come with Mac. You can easily find it from Spotlight.


In order to get media files from iOS device, you need to connect your device to the Mac. Then you will be able to see media files on your devices in Image Capture. The neat thing about this app is that you can also import media files from any other devices, such as camera, Android device, or USB hd.

AirDrop


This method is so convenient that you don't need to a wire to connect your iOS devices to Mac. In order for your Mac to accept files from your iOS devices, you have to set up your iOS Airdrop to Everyone. This can be done easily from iOS mission control panel.

Open your Finder and select AirDrop on left panel. This will make your Mac ready, as an AirDrop point, for iOS to share.

Then you can open your Photo app on iOS. Select photos and movies.  Tap on share button. Finally, select your Mac icon to send files. All shared files will be saved into your Download folder on Mac.

The only restriction is that this method is available to iOS devices.

By the way, AirDrop is also the best way to share media between iOS devices. You will be able to get original media with timestamp, location and other meta data.

Tuesday, June 14, 2011

iPone Tip: Autocorrect

Just watched a tip from Apple's iPhone Quick Tips. Here are some snap-shots about the tip.

When you type, you may see hint for correction:


You may miss to correct the wrong word:


Just tap the word, you will see corrections:


and you can tap the correct word:

Saturday, May 7, 2011

iPhone 4.3.3 Update

This is the expected update for iPhone location issue. Apple releases this update to restrict location file saved on iPhone and there will be no more back up of the location file back to Mac. For me, I really do not concern any location information collected by iPhone, because I trust Apple doing this for better performance issue. As you can read the information about the fix, all it is about the cache. Without cache, the performance is not going to be better.


The following is the comparison of the used space difference between before and after:

Command: df -lakUsed(Kilobytes in 1024-blocks)
Before ...412
After...717,196
Difference (A-B)716,784


This space calculation may not be correct since I noticed several podcasts were also downloaded during the update process.

Friday, March 20, 2009

Connie Talbot 6 Years Girl On Britian's Got Talent Show

Two days ago I watched iPhone OS 3.0 Software Sneak Peak Show. There are so many excitement features. Specially I am very impressed by Smule' music application: Ocarina. Then I went to Smule's web page and saw a show of Connie Talbot, 6 year girl, Britain's Got Talent Show.