Showing posts with label iOS. Show all posts

Monday, April 13, 2020

Link to a note in Notes.app

Notes.app is a very good app in Apple eco-system. You can add a note on Mac or iPhone or iCloud. Then all the notes are synced in iCloud if you enable notes on iCloud.

There is a problem to access to a note, especially when you have hundreds or thousands of notes. It is really hard to find out an interested note.

I developed an app: TapToCount-3W. This is a convenient and creative tool to write notes anywhere when you have an iPhone. By categories you define, it is very easy to organize your taps or notes. With a finger tapping on screen, you can create a tap with 3 pieces information: When, Where and What. "What" is a note associated to a tap.

Normally, I don't like to write a lot of text in my app's note. It is much better to use Notes.app or EverNote to write a note. Then, a question comes to my mind. Can I have a URL link in a note, and then I copy/paste the link to my app.

Yes, it is possible. Just follow these simple steps:

  1. Click or tap a note's Add People icon
  2. Enter an email, it can be just you!
  3. Then a link is available in Sharing. I could not find Copy Link in iPhone, but it is in Mac.


In this way, I can have a link in my app.


From this story, I think that any shared resources in Apple devices should have a link or URL available for accessing.


References


Tuesday, December 10, 2019

Live YouTube with OBS

I recently got a request from a group of my friends to do a live streaming on YouTube. I did this long time before on my Mac. I thought that it should be easy, even though I still decided to do preparation one week ahead of time. I could not get it to work at start. I have spent several days struggling to figure out how to stream video and audio to YouTube. Finally, I got it work. Here I would like to make some notes on this experience.

What I need for Live Streaming


YouTube raised bar to do live streaming for mobile devices, at least 1,000 subscribes for the time being (Dec 10, 2019). I have to do it with software on my Mac. Here is the list I have to set up:

  • Live streaming software: OBS (Open Broadcaster Software);
  • Web camera as movable camera to shoot: EpocCam for iPhone to shoot, and EpocCam View on Mac to receive video from EpocCam on iPhone;
  • External microphone for audio recording.
and of course, YouTube account is requested to do live streaming. Another thing is that Chrome is required to run Live YouTube, since Safari does not support some features by Live Y.

iPhone as Web Camera


EpocCam iPhone Webcam Viewer is a Mac app, which can be obtained from App Store. On iPhone side, you can also get EpocCam iOS app. In order for Mac to get video source, run the iOS app first, and then run the Mac app on my Mac computer. Both should be on the same network. This is very easy and straightforward step up.


OBS Configuration for Video Source

OBS installation is very easy as well. For Catalina OS, you may experience some issue to run the installation package since it is not from from App Store. Open System Preferences | Security & Privacy, and you will see in General tab that installation... for permission.

Catalina OS has more security features, thereafter, capturing screen/windows, and accessing to a mic have to be permitted by user.

The first difficulty is to get video source for OBS streaming. After one or two days's investigation I eventually found a way to get video source: window capturing. This can be set by adding video source from source panel:


EpocCam running window can be found in window list:


OBS Configuration for Audio Source

The most difficult one is to configure audio source. Before set it up, the following app should be installed first:

iShowU Audio Capture

Basically, this app is used to install a driver as extension to OS X so that it can used as a way to capture audio on Mac computer. The installation process requires to give permission from System Preferences | Security & Privacy.

The next step is to set up audio output device by running Mac utility app: Audio MIDI Setup. Add a new Multi-output Device from left panel:


above is the case of Multi-Output Device with iShowU Audio Capture and Built-in Output checked.

Remember: each time start a live OBS streaming, make sure this Multi-Output Device is selected as output device either from System Preferences | Sound Output tab, from top right Speaker icon:


or


The final and very important step is to start OBS from Terminal with the following command(audio capture would not work if launching OBS directly from Applications!):

open /Applications/OBS.app/Contents/MacOS/OBS --args -picture

When you first time to run this command from Terminal, you will get permission prompt to let this shell to access mic. I think that access to microphone is done by running OBS with argument settings from Terminal. You can verify it by looking at Audio Mixer penal on OBS window's bottom.

Don't close Terminal during live streaming period!

This is my OBS settings for Audio:


The above are all my findings after several days and long hours struggling. I am very happy to get all the issues resolved.

I wrote this blog for my future reference and hope it may help you with similar difficulties.

References

Thursday, November 14, 2019

iCloud Continuity

One of iCloud Continuity features is copy/paste. I like this very much. I could type in text on my Mac, then make a copy. With this continuity, I could paste text easily on my iPhone.

However, my recent Mac update from MB Air to MB Pro. I could have this feature to work on my new MB Pro. I tried to search for solutions on web but with no luck.

Apple Support


Today, I decided to get help from Apple. All of my Apple devices are out of Apple Care warrantees, MBP is 2017 and iPhone is XR. I thought that my issue is Mac OS update related issue, I may be able to get help from Apple, based on my previous experience from Apple support.

I phoned 1-800 line. Not waiting for long, I got a real person helper. I told him my story and also mentioned that I have turned on Wifi same network and Bluetooth. That saves him time to investigate issues. He put me on hold to search for support information.

It seems that there is no need having Apple Care to get Apple's support. My case is OS ie iCloud service issue. That's really nice service from Apple.

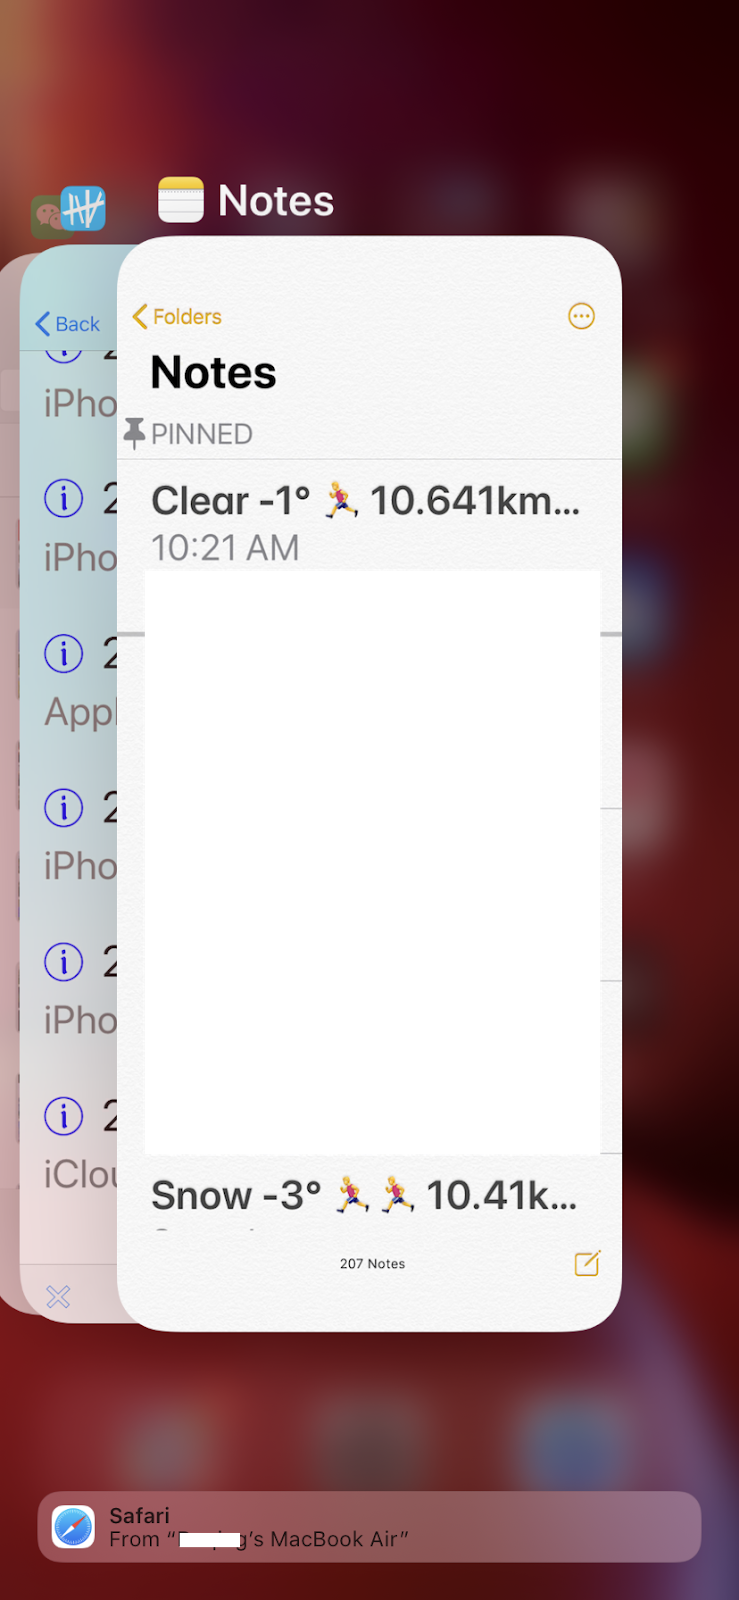
While the waiting time, I tapped my iPhone on bottom and swipe up to get active apps. I noticed that on the bottom, Safari with a message saying to my MBA. I realized that my iCloud might be paired to my iPhone and my previous MBA!


I took my MBA out and turned it on. I tried to copy something text there. Then I got the text pasted on my iPhone. It works, but no my updated MBP.

The helper was back. I told him my findings. I said, it might be my iCloud service is paired between iPhone and MBA. Is there any way to find out this pairing and change it to my MBP? I asked.

To cut story short, he said that it is beyond his knowledge to solve the issue. He has to pass it to senior person to provide solution.

Solution for iCloud Continuity and Universal Clipboard


The second helper was a lady. She remotely accessed to my Mac. Quickly with her investigation and suggestions, I finally get Continuity and Universal Clipboard working!

She asked me to restarted my iPhone and Mac first. I said I tried that, still not working. Then she told me to sign out my iCloud from my iPhone (General | My Apple ID... | Sign Out). Then restart my iPhone, sign in again.

It took a while to get all the data back from iCloud. She told me to log on my MBP. I opened my Notes app. I tried to type something there. Quick I saw the changes are reflected on my iPhone. This part is working.

However, the universal clipboard is not working, still I cannot paste text copied on my Mac.

She continued to investigate my Mac. From System Preferences, in Profiles, she found some malware on my Mac! That's amazing, first time found malware on Mac, from Apple support.
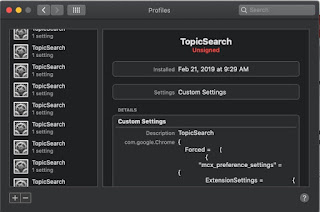


She told me to press "-" to remove them first. Then She told to get a tool to remove it from my Mac. The tool is from malwarebytes.com. That's another surprise for me, using third party app to kill malware. I was hesitated, but I followed her suggestion.

I downloaded the installation package from malwarebytes.com, installed it, then opened it. She told me to scan first. TopicSearch was found in system library. Final step was to remove it. If I was convinced my 1-800 number is correct, I would not do that.

After I restarted my Mac again. I gave copy/paste a try in Notes app. Finally, it was working. The problem was resolved!

"Thank you very much, your Apple support is super!" I finally told her. She smiled.

My Understanding of iCloud Continuity


After everything is working between my iPhone and new MBP. To my surprise, my MBA also keeps working iCloud. I tried to copy of an image in MBA, and I could paste it in my MBP and iPhone!

Based on this experience, my initial understanding of iCloud Continuity was not correct. It is actually not pairing of iPhone and another device such as Mac. It is the continuity among all iCloud based devices.

I think that initially I configured the continuity feature in both iPhone and MBA. Somehow, my when I later added my MBP, the cached configuration did not pick the new device automatically. As Apple helper did, I had to sign out iCloud from my iPhone and sign in again. All devices I set up in my iCloud them are recognized.

It is really cool to see iCloud continuity working among all Apple devices.

References


Apple Support Line in my iOS app. I made a record by a tap in my app with following note:


I saved all my Apple related stories, activities & events in TapToCount-3W app. It makes me easy to recall and find contact information.

Malwarebytes: How to install Malwarebytes

Friday, April 13, 2018

Update to macOS High Sierra

It is late time to get my macOS updated to High Sierra. I had to to do this when my iOS phone was updated to iOS 11.3. I could not run my Xcode project from my mac to my iPhone with the new iOS. I quickly found out the reason I have to update my mac to High Sierra.

Anyway, the update is very smooth. It is a long process of about 40 minutes. I did late in the night and saw the update completed early in the morning.

Here is the space difference before and after the update.

Before:


After:


It is not surprise that I get more space after the update. Nice job, Apple!

Sunday, September 10, 2017

Do you know your sleep patten?

If you ask me this question several weeks ago, I would shrug and could not tell you anything. Normally I would go to bed when I feel really exhausted. I have no problems to sleep and would go all the way to the next morning or the time I have to go to washroom. However, my sleep may be interrupted by some sudden events or some thoughts causing me awake hardly back to sleep. If this kind of things happen more, it may indicate my health status in downhill.

I know that sleep is very important in terms of health. With mobile technology in past years, I notice that many mobile device or sensors could tracing sleep pattern. However, I have been very hesitate to purchase one just for monitoring my sleep pattern.

Until recently, an icon in Clock app caught my attention. There is a new icon in the tool bar in the Clock app. The icon is a bed. Soon I found out this is called as BedTime, something related to sleep. After my initial investigating, I really love this simple and elegant app.

How to open BedTime

Normally I open Clock from Control Centre, swapping from bottom up. Clock is one of most commonly used apps, finding world time and setting up alarm.


The BedTime is right in the middle of bottom tool bar.


The first time open this app, you will go through several steps to set it up. I think you don't need to bother about details of each setting, just accept the default settings. You will be able to change those settings when you know how to use it. Here is the main screen of BedTime.


The Options on the top left corner is the place you can change settings.

Use BedTime

The interface of BedTime is very simple. The yellow circle arc indicates sleep time, one end as to bed time and another as up time or alarm time. You can tap on either end and drag to a time as your wish. The number in the middle shows the duration of bed time.

If you want to keep certain number bed time time, for example 8 hours, you can set up both ends first, and then drag the yellow circle to adjust both to bed time and up time with bed time unchanged.

After your setup, you may get a notification before bed time, 15 minutes as default. At up time, alarm will wake you up. I find out this is really good replacement of alarm.


You can tap on Stop or open your iPhone with a tap on Home or on Stop button.

Note: there is a separate volume control for alarm in BedTime's Options.

Tips and Tricks

You can enable/disable Bedtime time on certain days within a week. There is only one setting for bed time and up time. You cannot set different times for difference days within a week. Fortunately, I know well about when I should be up the next day. So I set up my bed time and up time every day to guaranty my sleep time. I think it is good to set up bed time every day so I keep more attention to my sleep.

As iOS ecosystem, BedTime is integrated with Health app. All the history bedtimes are saved to Health Sleep section.


From Health, you will see more detail about your sleep data, as well as deleting and adding data.

One interesting thing about BedTime is that this app is smart enough to know when you are awake. If you touch your iPhone during bedtime to open it, that active moment is marked as one end of bedtime, and the next inactive moment would be marked as another in-bed time. This is really good if you have to get up do something, for example washroom. You will be able to see your sleep pattern in more detail in Health Sleep section.


If you manually add sleep time from Health, you will set three types of sleep data.


Notice that the time from BedTime saved to Health Sleep section is "In bed". There are other two times: Asleep and Awake. Indeed, there is no connection to any sensors in BedTime can tell if you are in asleep. This app is a simple one to let user to set up bed time and up time. Therefore, it will be up to user to make accurate adjustment in order to trace user's sleep pattern.

After weeks use, I really like this new feature in Clock. At least there is a way to let me know my sleep pattern, at least very close to (actually it records in bed time). BedTime also let me know if I have enough sleep time so that it would motive me to pursue a heathy life style.